• Home
  • Travel Stories
  • Travel Photos
  • Photography Tips
    • Lens
    • New Camera
    • Tips
  • About
  • Contact
  • Download

Tama Zoom

facebook google twitter tumblr instagram linkedin
Five legendary photographers which is also Canon Ambassador ( Canon Professional Network) give advices and tips for beginner photographer. They are Nick Nichols ( National Geographic), Gary Knight ( VII photo Agency), Ziv Koren (Polaris), Frits van Eldik ( formula 1 photographer) and Paolo Pellegrin (Magnum)

Ziv Koren

For examples :
  • Nick Nichols, National Geographic Editor: " As a young photographer, you should listen your conscience , you will find something taht you want to share to entire world"
  • Ziv Koren, “ not only magazine  newpaper, there so many choices to share your creation , internet open so many new opportunity to share your creation"
  • Paolo Pellegrin, “ At the end the quality is always seen, work seriously and if you do good, at the end you will be famous"
The full l video , click HERE.
Share
Tweet
Pin
Share
No komentar

We use very high ISO (above 800) when we face the condition such as : when the light source is very gloomy, when we need high shutter speed, when we don't want to turn on the flash, and when we don't bring tripod The biggest concern when we increase above 800 is the noise appearance, the little black spot that usually comes up at the result photo. 

But don't worry , you don't have to so worry about 'noise'. There are good reasons to make you calm down even you use high ISO in photoshoot. Here we go: 

1. Camera technology Outgrowth

Almost all new generation Digital SLR Camera feature 'noise reduction' technology that very reliable, we can shoot until ISO 1800and the result is quite good. All i know, almost all camera from Nikon or Canon in beginner until Advanced class are very good to reduce the noise that appear from High ISO using. Moreover some good quality pocket camera such as Panasonic LX3 ( or the new one LX5) adjust 'noise reduction' which is very good.

2. Noise Reduction Software

If your camera don't feature shophisticated noise reduction technology, you can use noise reduction software in your computer. The software such as : Noise Ninja, Noiseware or Dfine is very effective to reduce noise from photo easily and quickly.

3. Some Noises is Good!

Yap, moreover when you don't have camera with sophisticated noise reduction technology and you don't wanna use noise reduction software , but don't worry. We don't have to always reduce the noise. Sometimes with noise the photo looks more artistic.


Share
Tweet
Pin
Share
No komentar

In the article before we've talked about elements of composition such as : line, and pattern as the elements of photo composition. Now, we will continue for the third composition element which is "Shape".

Basically Shape element is more fundamental better than the other composition element because Shape is our way to give identification for an object. You can imagining about how the face of  radio broadcaster based on their voice that you heard, even you never saw them directly , you just expect it. When you smell some flower and guessing what the kind of flower, but without see it directly you will never know what exactly kind of the flower. 

Origami


So basically, shape give the photo the obvious identity so the audience no need to guessing what it is. A  photograph of origami like picture above is the perfect example about shape. 

For more implementation, you can use geometric shape as standard to set or arrange some objects in photo,  so that will look more dynamic and orderly. 

For example, you have to shoot 3 people in one photo, if you set all of them to stand in the same high, it will produce boring photo. But if you set them following a triangle shape, so your photo will look more dynamic , balance and interesting. 

Family photograph


All right, ready to try? 
Share
Tweet
Pin
Share
No komentar

Mirrorless Cameras

Mirrorless Interchangeable-Lens Camera (MILC), do you think that it's too long for camera name. Actually there are other name like Compact Camera System , or Electronics Viewfinder with Interchangeable Lens (EVIL). Okay that''s too much let's we just call it Mirrorless Camera , got it?


Mirrorless camera is the one of the most popular camera nowadays since 2008 when its launching. There so many same question that people ask me the point is " What is the Mirrorless Camera?" . For photography lovers, i just answer " The camera that actually similar with Digital SLR without mirror". But for people who just love photography or don't know anything about photography.. of course that answer can't acceptable by them. So i will explain clearly what is the Mirrorless Camera and why its different with Digital SLR.


Background

The classic question like " what camera type that i should buy?", actually is simply question but the answer is quite risky : Digital SLR or Pocket Camera? . It's depend on your priority, if you want the best quality photographs , so pick the Digital SLR. Meanwhile if your priority is like small size, light, handy, and cheap price, you should pick pocket camera with not so good in quality.


So this is the win win solution that comes out from camera maker with the superzoom camera class, although the superzoom camera still far away from standard to become the solution about this thing because the censor size is small. 


Mirrorless Camera is the Win win solution Camera Type

The Characteristics of Mirrorless Camera:

1. The size is relatively small and handy
2. Lighter better than Digital SLR
3. The picture quality isn't so far with Digital SLR
4. The censor size is same with Digital SLR middle class
5. You change the Lens
6. The price isn't so expensive like Digital SLR ( except Leica and Fujifilm X)


The differences of Mirrorless and Digital SLR


The Digital SLR camera needs mirror to show the picture in viewfinder,but the mirrorless camera no need mirror . The consequence is the camera is smaller and lighter in weight and the price is more cheap but we lost the viewfinder optic, that's why camera mirrorless using electronic viewfinder (EVF) , except Leica and Fujifilm they are still using viewfinder optic. The picture quality of this camera is similar with Digital SLR because the Censor Size is relatively same. 

Read Also : Exposure Modes on DSLR and Mirrorless Camera


Mirrorless Camera Choices

In the market nowadays at least there are seven camera system from almost all camera maker except Canon , they are :
  1. Micro Four-Third: Olympus OMD dan PEN
  2. Micro four third: Panasonic G
  3. Samsung NX
  4. Sony NEX
  5. Nikon 1
  6. Pentax Q dan K
  7. Fujifilm X
For recommendation of the best mirrorless camera, you can read this article.


How Good the system of Mirrorless Camera?

Buying Mirrorless Camera technically is same with buying Digital SLR, we need to arrange the Complete Camera system, such as : buy the camera body, buy lens which is compatible with its camera also the accessories. That's why we can assume that its a long term infestation. 

If the Digital SLR is born since 19 years ago and SLR film system were already exist since 54 years ago, then the mirrorless camera just comes out since 7 or 8 years ago. So there are so many the breakthrough and improvements that possible will come. Especially in speed, accuracy, and viewfinder. It means that Mirrorless camera day by day will more and more popular and it also have unique attractive, depend on its simplicity they can make good quality picture and control like Digital SLR. 

Share
Tweet
Pin
Share
No komentar
You can make   burst or  blur zoom  photo using simply technique. Just rotate the zoom ring in lens while the camera take the exposure, and voila our eye will get picture like this. In zoom blur /burst there are blur lines that make the subject feels like they are moving. When you use this in right situation, this technique can change ordinary subject become amazing!


The Things that You Need

The point is that we will change the focal length during the camera is taking the picture. So, while the shutter is open , we will rotate the zoom ring in lens manually. Thus, first thing that you need is a Zoom lens and camera , also never give up to try and try for several times to get the best picture. 

Exposure

To get moving effect, we use low shutter speed better than usual. Just using your hand, the shutter range between 1/ until 1/10 seconds are enough, we can use the lower shutter speed if we use tripod. Don't forget to set your camera mode in Shutter Priority (TV or S) and try some different setting until you got the best photo.

1/13 second, f/2.8 ISO 640

Focus

If you just want to try, for exercise place a subject as as the focus point in the center of frame. You can use manual focus or back button focusing. 

Zooming

Set lens in the longest zoom position and place the main subject at the center of frame. While the right hand is pressing the shutter, rotate the zoom ring until the focal length is shortened. For the first trial, move the zoom ring softly. We don't have to rotate the zoom ring until full. On the next  trial, move it quickly ( as stable as possible). Look at the different results? Which ones you like?

1/10, f/22 ISO 100

Extra Equipments

If you have tripod , this equipment can be used to make the sharp part  of photo more stable, so the blur lines but the shape is still straight. With using tripod we also can try the burst zoom technique in the night , but with hand it's just impossible.
Share
Tweet
Pin
Share
No komentar
I believe, this 20 photoshop shortcuts bellow will make your work more faster in photo editing. Work with any software, we will do dome job that you Will do repetitive , such as : Save-Edit-Undo and etc. If you ever use the Microsoft Word and press the Control-S keyboard to save file or Control-Z for undo, thus the combination of buttons in keyboard is called Shortcut. Work with shortcut will make our work faster. 


So, in this article i will choose the 20 most useful photoshop shortcuts to make your work faster and faster. The Control is shortened by Ctrl, if you use Mac , please change with Command (Cmd) button and Alt with Option. The minus (-) sign except i give quotation mark, it means and, if the combination Ctrl-A , you can read as press the Control and A button in same time. Understand? 

The Most Useful Photoshop Shortcuts

  • F – change the screen mode. Use this button to change the display , such as : normal, full screen or full screen with the black background. 
  • X – Change the color. Switch the colors between background and foreground, if you do masking, this shortcut is very useful. 
  • D – Change the foreground color and background to default colors which are black and white.
  • Ctrl – “+” atau Ctrl – “-” – Zooming out and in.
  • Ctrl – 0 – Fit on Screen. To make your photo fit with your screen monitor..
  • Ctrl – Alt – Z –If Crtl-Z means Undo, the combination Ctrl-Alt-Z means one step back , everytime you press this combination. If you feel that you do some wrong step, just use this combination several times. 
  • Ctrl – Alt – Shift – N – Make new layer 
  • Ctrl – A – Select all. make the selection of all object on canvas
  • Ctrl – D – Deselect All. Use this combination after you've done with the selection. 
  • Ctrl – E – Merge Layers. Combine the chosen layer with its bellow layer. 
  • Ctrl – Shift – E – Merge visible. Combine with all layer which are all layer look become one 
  • Ctrl – G – Group layers. Put the some layers in one folder or group. 
  • Ctrl – T – Free transform. If you want to rotate or resize, press this buttons. 
  • Ctrl – J – New layer via copy. used for duplicate the current layers (active) into new layer. 
  • Ctrl – I – Invert selection. The reverse of Select All, this command choose the object that unselected. 
  • [ – Raise the brush size
  • ] – Decrease the brush size 
  • Shift – [ – Decrease the softness a brush in 25%
  • Shift – ] – Raise the softness a brush in 25 %
  • Ctrl – Alt – Shift – K – If you forget with shortcut combinations , just press this combination and photoshop will show you the Help menu for command of shortcut keyboard.
All right,Enjoy your Photoshop. 


Share
Tweet
Pin
Share
No komentar
Handy, back to basic and No Mainstream, Its the philosophy of Leica on the Launching event of Leica M-D (typ 262). When the other cameras are racing to make camera with touchscreen LCD that we can rotate to the front for selfie, Instead Leica just lauching the camera without LCD Screen at all.

Leica want to introducing the shooting sensation with rangefinder without the feature which is not necessary. This camera will bring back photographer feels like shooting with Leica M on 80's until 90s, but of course the recording media has been changed with censor digital and memory card. 


This camera offering the very simply camera, Leica hope that the photographer will more focusing and more concern to make best photo better than keep busy to look at the result in LCD screen. The camera design is also unique and consistent with M Series of Leica before : simply, strong, elegant, and look expensive. 

To fulfill the simply and essential principle above, Leica do some things like this : 
  • They dump the LCD scree from the back and replace with ISO control wheel
  • They dump the video feature that was featured on Leica M ( typ 240)
  • They always consistent using rangefinder principle ( it means manual focus)
  • There are only control wheel in camera body : Shutter speed-ISO-Mode ( the aperture is chosen by lens). No more button except On-Off Button. 


If you are the big fans of Leica Rangefinder, the brave decision of  this Germany camera maker maybe isn't so surprise, because Leica have to make product differentiation from retro camera booming  on market today , such as : Olympus PEN-F, Fuji X Cameras and etc.
Because  there's no LCD screen, photo file which is made in Censor will directly send to the memory in DNG (RAW Standard)   every time we press the shutter, and the photo result can only opened by RAW Editor Software such as Lightroom and Photoshop. So there's no time to check the result instantly like the other digital camera. Our eyes are focused on subject in front of camera and  of course you don't spend your time to check the LCD scree because there isn't exist.
Beside simply and essential, Leica M-D  will featured by shutter sound which is so quite. In specification, Leica M-D featured the full frame censor with 24 Megapixel , and ISO range 200-6400 and the body is strengthen by brass in above and bottom part. 
Camera like this is a niche product, product that was made to supply the fanatic small market. Moreover with the very expensive price for body only ($ 6000). But there are always people who will buy  Leica M-D product, because Leica is Leica. And for them who buy the Leica M Camera Series , they must be know the best deal to get this expensive camera. 

Share
Tweet
Pin
Share
No komentar
       Focus and Recompose is one of tricks that help photographer to set nice composition but still can set the focus dots and get the right Depth Of Field . Focus and Recompose technique usually can be used when the interest in the end of frame, even in the right corner, left or under. 


    The sample photo above is when you choose right focus and recompose technique.

Understanding recompose ? 
     In photography term, recompose is set again the photo composition. Well, let’s figure out :

Let’s we create fantasy model named Micky. When we shoot Micky, you place the Micky face in the center of frame in order to lock the focus. But if Micky’s face in already in the center of frame it will make photo so boring,then we want to place micky’s place in the Top left corner . Do you Remember the rule of third ?


      This is called recompose. As the analogy : you set your room as standard room , then you realize that you’re not satisfied, then decide to reset your room to make it more comfortable.

Why recompose is needed? 

Why we have to recompose? Why we don’t start from beginning? Although we can set the micky’s face since beginning in the corner as we want.

Well, the answer is it could be. But in the practi, the location of focus dots isn’t easy and so fast to moving. Moreover, take a look the example of focus dots in the camera like in the viewfinder camera Digital SLR Nikon D5000  bellow:


We’re forced to follow the focus area that pretty small and it’s not reach the frame corner like we want. We are directed by camera maker to place micky face in area that pretty small in viewfinder frame.

There are break time when we move the focus point or change the focus mode when we must shoot fastly or we will lost the good moment when micky is smile awkwardly. Moreover, in any camera, the center point is the most accurate focus point and fast to lock the focus.

When we in the low light condition, in order to get the focus point that we often have to choose the center focus point that most sensitive lights.

In many situations, focus technique first then recompose is the fastest choice and most often used. When you do properly , this technique can help us to shoot moment and faster and it will keep produce the sharp focus.

How to do Focus Technique and Recompose

There are some way to do focus technique and recompose. They are :

a. With one shot AF-S or single Servo AF-S mode

The easiest and fastest way is choose the focus mode Single Servo or One Shot or depends with your camera type, the points is choose the mode where camera Will lock focus only when we half press the shutter.

Place the focus point in the center, direct the camera towards photo object, lock the focus with half press the shutter and make sure that focus point was blink nor release the sound “bip..bip” which is the sign that focus is OK, then direct to do recompose suitable with your new taste, then full press the shutter.

This way is suitable to who like to moving while shooting.

b. Using Auto focus Lock 

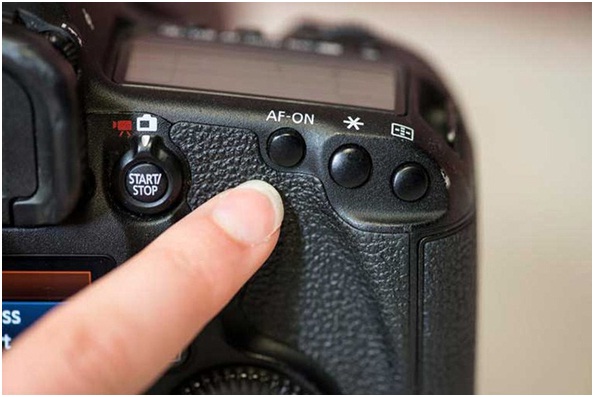
The second choice is using LR camera nor mirrorless. In Nikon was marked with AF-L/AE-L, in Canon was marked with asterisk :


This button is designed to lock the focus and light metering at once on photo subject. The way to use is : lock the focus with press the the shutter button. After focus was locked , without release the half shutter, press the AE-L button or asterisk mark button the d the recompose photograph. The size of exposure will not change and keeping in the first photo.

c. With back-button technique focus or AF-ON Button 

The last and fastest way is using AF-ON button, this way oftenly named with back button focusing.The point is with the AF-ON button we don’t have to do half press shutter button to find an lock the focus then to choose the exposure we just need to full pressing the shutter button.
Share
Tweet
Pin
Share
No komentar
Newer Posts
Older Posts

About me

POPULAR

  • The Best Mirrorless Camera 2016
           We start from how the mirrorless camera was born. Mirrorless Camera is the camera type that start trending at this time and  it’s pr...
  • Magical Sunset and Sunrise Photographs Tips
          Do you ever hear “ Nature is Painting For Us” ? We can see wonderful painting everyday through your own eyes without have going to Ph...
  • Holding Digital SLR Camera Techniques Like a Pro
         There are many basic things and simple but precisely you don’t know properly because you think that it’s simple to learn and it doesn’...
  • Simply ISO Concept
           The definition of ISO is the size of level of sensitivity of camera censor toward light. More high the ISO setting , more sensitive ...
  • Digital Camera Lenses
       Most of beginner photograher oftenly still confuse when they want   to choose lens which is suitable with what they really need.   Despi...

Labels

Contest Lens New Camera News Photographers Tips Travel Stories

recent posts

Blog Archive

  • ►  2018 (1)
    • ►  March (1)
  • ►  2017 (8)
    • ►  June (3)
    • ►  April (5)
  • ▼  2016 (88)
    • ►  October (1)
    • ►  September (13)
    • ▼  August (8)
      • Tips for Beginner Photographer From 5 Legendary Ph...
      • High ISO, Why Not?
      • Composition Element in Photography : Shape
      • Understanding Mirrorless Camera
      • Photography Tips : Blur Zoom or Burst Zoom
      • 20 Photoshop Shortcuts That You Should Know!
      • New Camera : Leica M-D (typ 262), Digital Rangefin...
      • Focus and Recompose Technique – Photography Tips
    • ►  May (1)
    • ►  April (15)
    • ►  March (50)
FOLLOW ME @ytrihatma

Distributed By Protemplateslab & Created with by BeautyTemplates